29 Nov 2022
Ron Ofri PhD, DECVO, DVM provides both a practical and simple explanation for how to conduct this series of tests on companion animals.
Ron Ofri
Job Title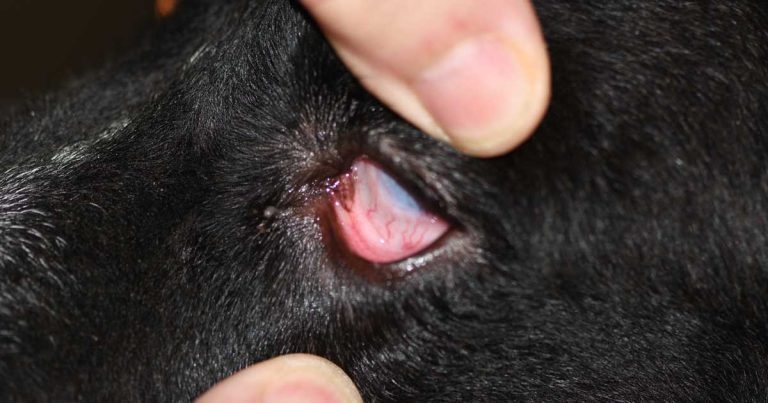
A comprehensive ophthalmic examination is actually simpler than you think.
Admittedly, interpreting some of the lesions could be challenging, but the actual examination is performed in a logical, anatomical sequence – from the outer surface to the back of the eye. Moreover, contrary to popular belief, the equipment required for a thorough ophthalmic examination is not necessarily expensive.
Indeed, the three most important items you will need are non-ophthalmic. These include:
Additionally, you will require a tonometer to measure intraocular pressure (IOP) to diagnose glaucoma and uveitis, and an ophthalmoscope for a funduscopic examination (although the latter can be replaced with a handheld lens and your transilluminator).
Finally, you should have Schirmer tear test (STT) strips to measure tear production, fluorescein strips to stain the cornea to detect corneal ulcers, topical anaesthesia and tropicamide solution to dilate the pupil, and fine forceps and/or swabs to evert the eyelids.
In ophthalmology, as in other disciplines, you need to pay particular attention to the patient’s age and breed. This is particularly important in dogs, as many breeds are predisposed to hereditary eye diseases.
Furthermore, keep in mind that even though the patient presented with an ophthalmic complaint, this could be a manifestation of a systemic or neurological disorder (for example, diabetes causing cataracts in dogs or systemic hypertension causing acute blindness in elderly cats). Therefore, a comprehensive history should be taken for all ophthalmic patients, and a thorough physical and neuro-ophthalmic examination should be conducted.
The patient should be observed as it enters the examination room, since visual deficits become more apparent in such an unfamiliar environment. Next, carefully observe the patient from a distance without touching it (as this may cause squinting), noting the following:
To perform a comprehensive examination of the lens and fundus, the pupil should be dilated with topical tropicamide. Most pupils will dilate within 20 minutes, so if dilation is indicated, you should consider administering tropicamide now.
This will allow you to take the patient’s history, perform a systemic examination and evaluate the ocular surface and anterior segment while the pupil is dilating. However, tropicamide is a parasympatholytic agent which may affect the results of three important tests that should be conducted now, before the drug is applied:
Now, you may apply a drop of tropicamide to both eyes, and continue with taking history and conducting a physical examination.
If pupil dilation is not indicated, it is still recommended that you perform the STT now, as manipulation of the eye and use of strong light in the subsequent steps may increase tear production. Evaluation of pupil size and PLR may be performed in step two, when you are assessing the visual pathways, and IOP can be measured at the end of the examination.
Evoking a menace response is an easy and frequently used test to determine whether the patient is visual.
To perform the test, use your hand to make a sudden threatening gesture; in visual patients, this will lead to a blink response. To avoid false positive responses (that is, a blinking response in a blind eye), make sure to cover the untested eye, and to avoid touching facial hair or causing strong air currents with your hand. Remember that you are testing a response rather than a reflex. Therefore, in very young animals, you may get a false negative result (that is, no blinking in a visual eye).
Another possible cause of a false negative response is facial nerve paralysis. Therefore, the palpebral reflex (blinking in response to sensory stimulation elicited by touching the skin of both canthi) should also be tested.
Navigating an obstacle course in the exam room is another useful test. Performing the test in a lit room and a darkened room will help in diagnosing progressive retinal degeneration, an inherited disease in many dog breeds, which usually begins with loss of night vision.
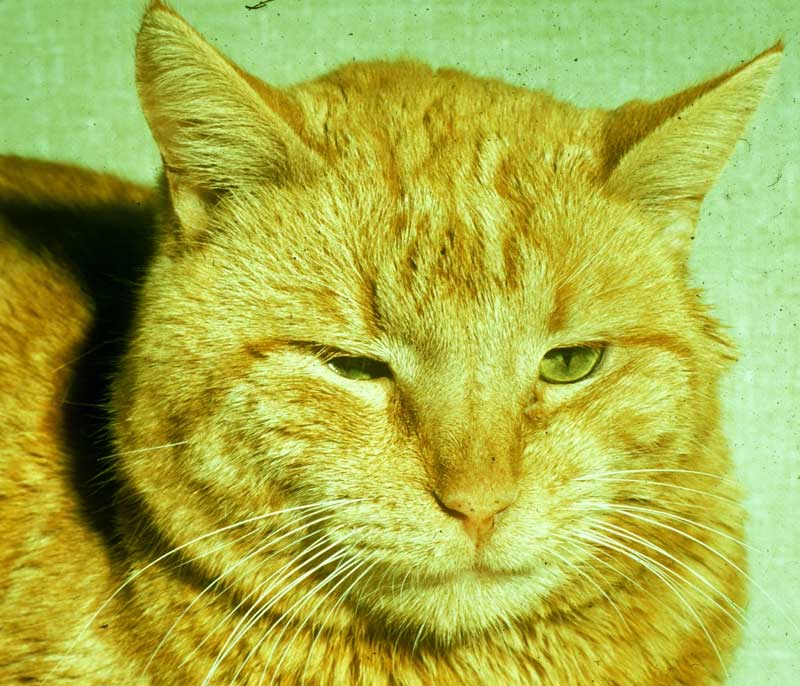
Subcortical visual pathways are tested with the PLR (which has already been evaluated) as well as the dazzle reflex, which is manifested as a bilateral, partial blink in response to a bright light (Figure 4).
Both the dazzle reflex and the indirect PLR test are particularly useful in gross evaluation of retinal function in cases when you are unable to see the pupil or the fundus of the tested eye (for example, due to severe corneal oedema or hyphaema).
However, remember that these are tests of subcortical pathways rather than vision and may be positive in animals with cortical disease.
It is likely you turned the room lights off to test the PLR and dazzle reflex. As noted in the opening paragraph, the rest of the test should be performed in the dark, using a strong light source and preferably a magnifying loupe.
Carefully examine the outer aspect of the eyelids, looking for discharge and signs of dermatological disorders such as alopecia, dermatitis, swelling, scaling, ulceration, crusting, ulceration and so forth. Pay particular attention to the eyelid margin; its entire length should be in close contact with the globe. If you are unable to see the margin, or parts of it, the lid may be everted (entropion). On the other hand, lack of contact indicates ectropion (drooping lid).
Abnormal eyelashes – and especially distichia – can be detected if you retract the eyelid slightly, as they will be highlighted against the background of the white conjunctiva. Surgical treatment of eyelid diseases will be discussed in a future Vet Times article.
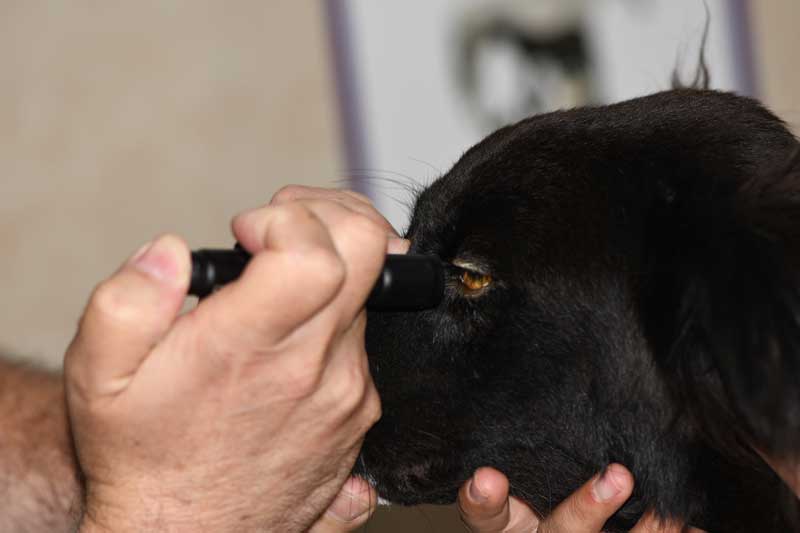
Palpate the orbital area to detect any abnormal swellings or fractures. Use the opportunity to press on the globe through the upper lid. This will elevate the third eyelid and allow you to inspect its outer surface (Figure 5). Resistance to your digital pressure may indicate the presence of a retrobulbar tumour or abscess (retropulsion test).
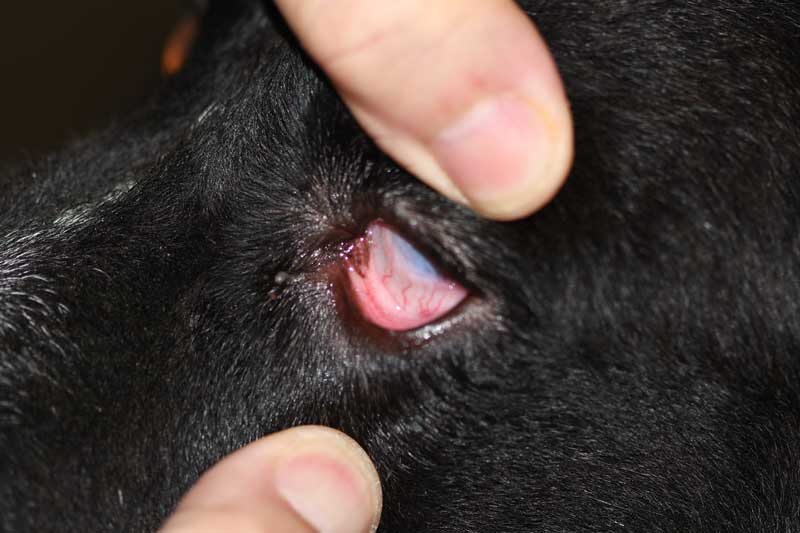
Slightly evert the eyelids to visualise the conjunctiva lining the lids and the two punctas. Use the opportunity to test the blink reflex in response to touching of the skin around the eye. Continue by examining the conjunctiva lining the globe and the cornea surface, noting any congestion, changes in colour, prominent vessels, oedema, thickening, masses, subconjunctival haemorrhage or discharge.
If necessary, the conjunctiva lining the inner aspect of the third eyelid margin is examined after application of topical anaesthetic and eversion of the lid with fine forceps. Look for foreign bodies or hyperplasia of lymphatic follicles.
Finally, examine the cornea, which should be transparent and smooth. Record any pigmentation, oedema, cellular infiltration, vascularisation, mineral or lipid deposition, or fibrosis that reduce transparency. Note surface irregularities due to granulation tissue, ulceration, perforation and iris prolapse.
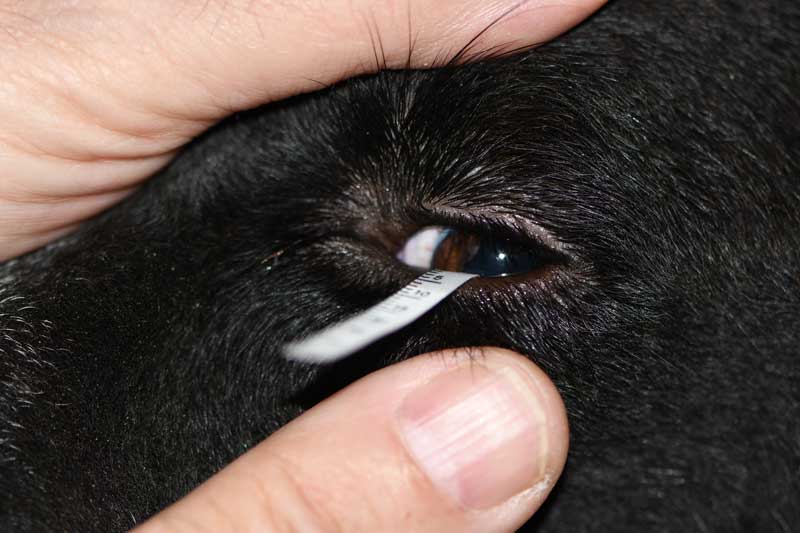
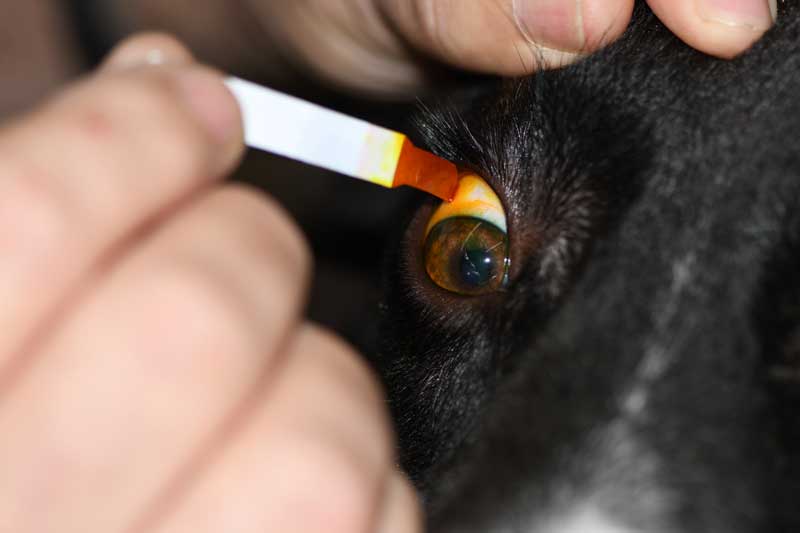
Compare the diameters of both corneas. A smaller diameter indicates a microphthalmic or phthisical eye, while increased diameter indicates buphthalmos due to glaucoma. In any patient presenting with “red eye” or signs of ocular pain, use fluorescein staining to diagnose corneal ulceration (Figure 6).
Looking at the eye from the side will help in evaluating the depth of the anterior chamber, which may change in various intraocular diseases – particularly lens luxation and diabetic cataracts.
Next, check the transparency of the aqueous humour filling the anterior chamber. Note any aqueous opacities such as aqueous flare, fibrin, blood, or hypopyon. Luxated lens, persistent pupillary membranes, iris cysts or vitreous strands may also be present.
Examine the surface of the iris for any masses or changes in colour. These may be due to inflammation, neoplasia or haemorrhage. Next, evaluate the pupil. Its shape may change due to iris atrophy in elderly patients, or adhesions of the iris to the lens or cornea. Pupil size changes in glaucoma, uveitis, and diseases of the retina or the nervous system. Changes in the colour of the pupil may indicate cataract, retinal detachment or vitreous haemorrhage.
In elderly canine patients, owners frequently mistake nuclear sclerosis for cataracts. For a comprehensive lens examination, the pupil should be dilated, and the lens evaluated using both direct and retro-illumination. The latter will help distinguish between true cataractous opacities and nuclear sclerosis. Also, look for early signs of lens luxation, such as an aphakic crescent or vitreous in the anterior chamber.
Finally, examine the patient’s fundus. As ophthalmoscopy and recognition of normal funduscopic variations requires lots of practice, it is recommended you perform an ophthalmoscopic examination in all your patients, and not just your ophthalmic cases.
This practice will help you gain the required skills and familiarity with normal fundus variations.
Most general practices will only have a direct ophthalmoscope, which provides a high magnification (16× in an average dog). However, it also has a very small viewing field of about 4°, which makes it difficult and lengthy to examine the entire fundus. Therefore, you should consider using a bright light source and a handheld lens (20D to 30D) to conduct a quick, monocular, indirect examination of the entire fundus.
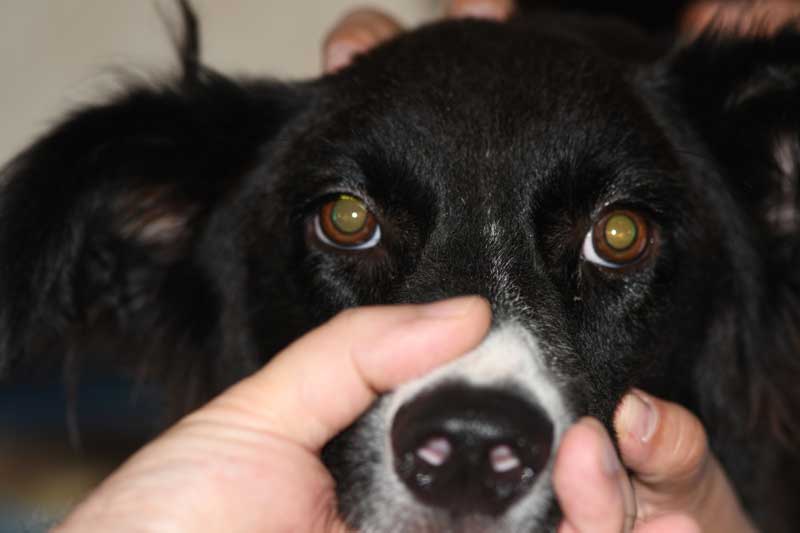
First, without the lens, evaluate the tapetal reflection from a distance, and use retroillumination to detect any opacities of the lens or vitreous (Figure 3). Then, place the lens close to the eye, focus on the fundus and examine the tapetum, nontapetum, blood vessels and optic disc.
Congratulations – you have completed your ophthalmic examination.