1 Mar 2022
Patrick Ridge BVSc, CertVR, CertSAS, MRCVS details the case of a successful procedure using computer-generated guides to treat these issues in a dog.
Patrick Ridge
Job Title
A seven-year-old cocker spaniel was referred for the investigation and management of a right forelimb lameness of a few
weeks’ duration.
The dog had previously suffered a left lateral condylar fracture, which had been stabilised with a transcondylar shaft screw, anti-rotational pin and lateral epicondylar plate.
On examination, the patient had a moderate right fore weight-bearing lameness, distinct pain was appreciated on gentle elbow extension and the lateral epicondyle was palpably thickened.
The previously operated left elbow had a reduced range of flexion with periarticular thickening appreciable.
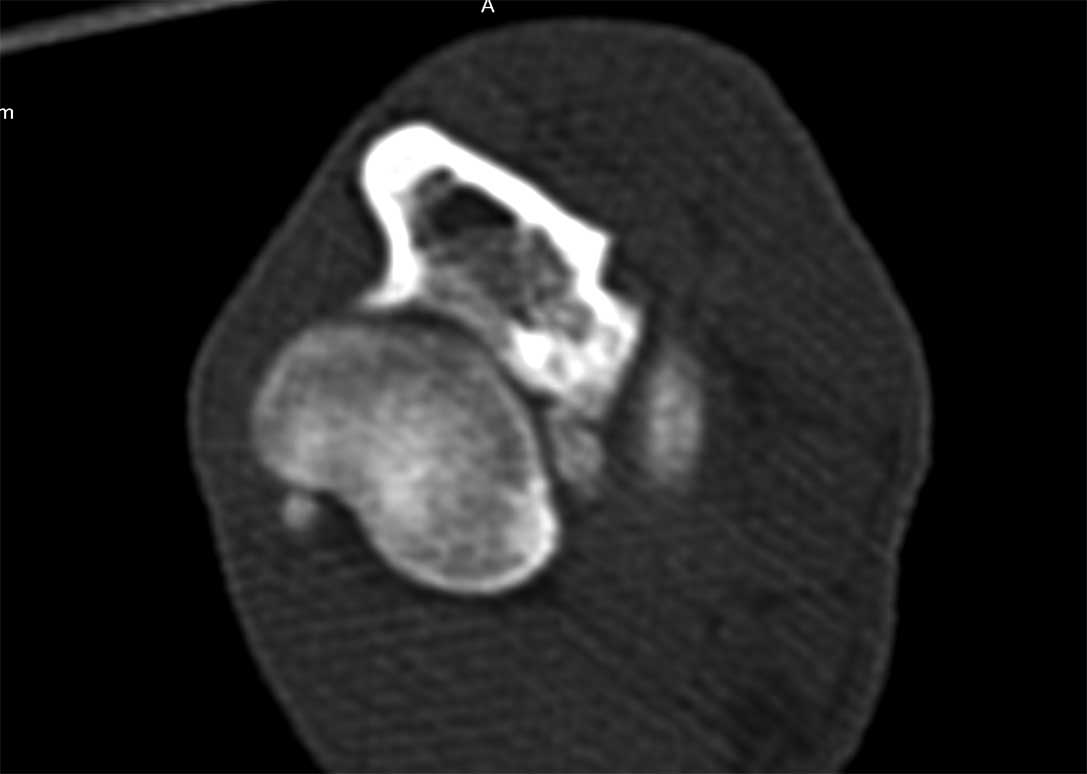
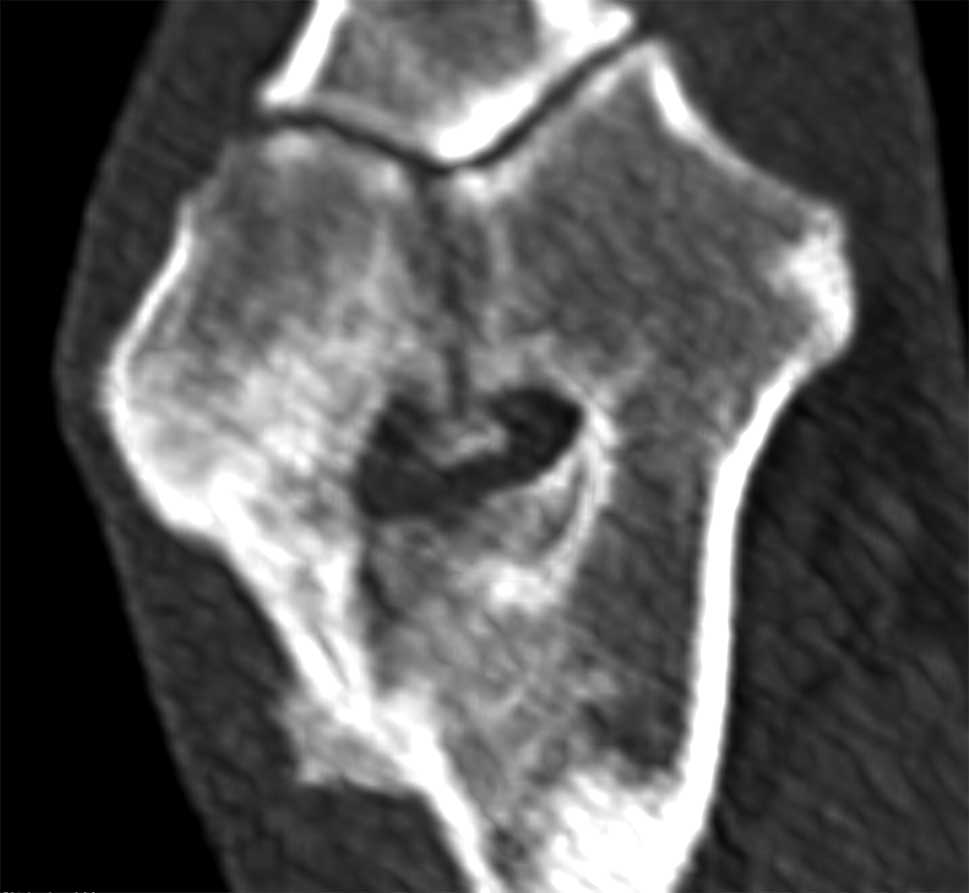
A CT scan confirmed a humeral intracondylar fissure (HIF) with sclerosis of the humeral condyle. In addition, a medial coronoid fragment was seen, and a smooth, callous new bone formation along the lateral epicondyle, bridging across a poorly defined oblique fracture line (Figures 1 and 2).
After discussion with the owner, the dog was confined to a cage with short lead-controlled toilet exercise.
Patient-specific guides were planned and printed to place a 5mm titanium locking screw across the condyle from medial to lateral.
Fifty milligrammes of trazodone (used under the cascade) was given orally twice daily to keep the dog calm in the cage.
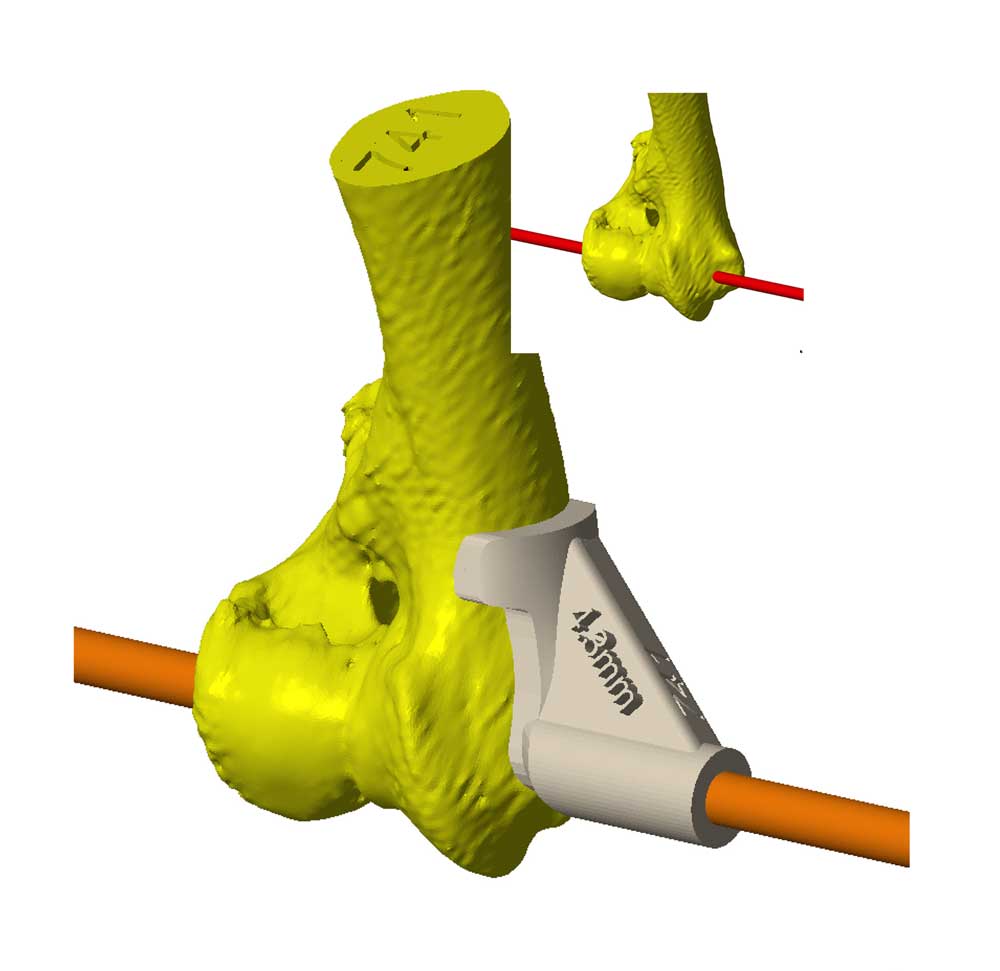
Bill Oxley of Vet 3D used computer-aided design (CAD) software to plan a 4.3mm bone tunnel across the virtual condyle, using the data from the CT imported to the CAD software.
Guides were then virtually designed and printed in BioMed Amber, an autoclavable and biocompatible material (Figures 3 and 4).
These fit the contour of the distomedial humeral epicondyle and “lock” in place on to the bone surface in one specific position. The result guides sequential drill bits across the condyle to achieve the optimal trajectory from medial to lateral.
Once the guides had been fabricated, the dog was readmitted. Under general anaesthesia, with additional opiate analgesia provided, a medial approach to the medial humeral epicondyle was performed, taking care to retract the ulna and median nerve and
vascular structures.
The superficial digital flexor tendon and tendon of the pronator teres muscle were freed from the medial epicondyle, and retracted distally. All soft tissues attachments to the distomedial humeral footprint of the guides were removed so that the footprint of the guides sat directly on to the bone surface, and care was taken not to damage the capsule and medial collateral ligament attachment to
the condyle.
Using sequential drill bits (2.5mm, 3.2mm and finally 4.3mm) and the dedicated patient-specific guides, a tunnel was drilled across the condyle from medial to lateral.
Extreme care was taken to prevent the drill from causing the lateral epicondyle to completely fracture.
A 5mm titanium locking screw was placed with the head recessed below the surface of the medial epicondyle. After placing the screw, the joint was then examined with a 1.9mm, 30°, fore oblique arthroscope.
The scope was placed into the caudomedial scope portal using exactly the same landmarks and technique as for standard arthroscopy, but through the open approach.
A standard craniomedial instrument portal was created in the same way and the joint was examined.
The irregular zone of cartilage extending from cranial to caudal in the intracondylar zone was noted, and gentle medial and lateral stress confirmed it to be stable.
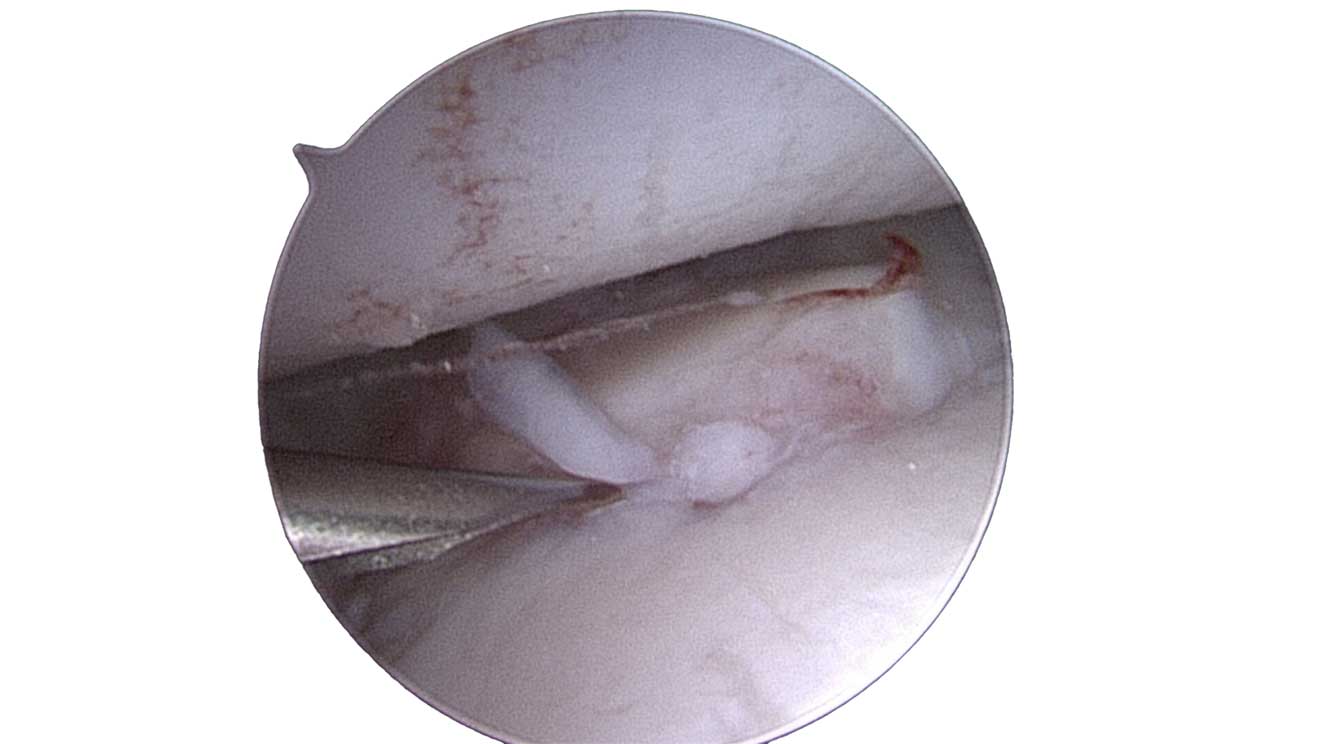
A large, minimally displaced fragment was seen at the medial coronoid apex, which could be removed with forceps. The medial collateral ligament was palpated and confirmed intact (Figure 5).
After removal of the fragment, the detached tendons were reattached to the medial epicondyle with a locking loop suture of polydioxanone passed through a 2mm bone tunnel in the epicondyle.
The rest of the medial approach was closed routinely in layers.
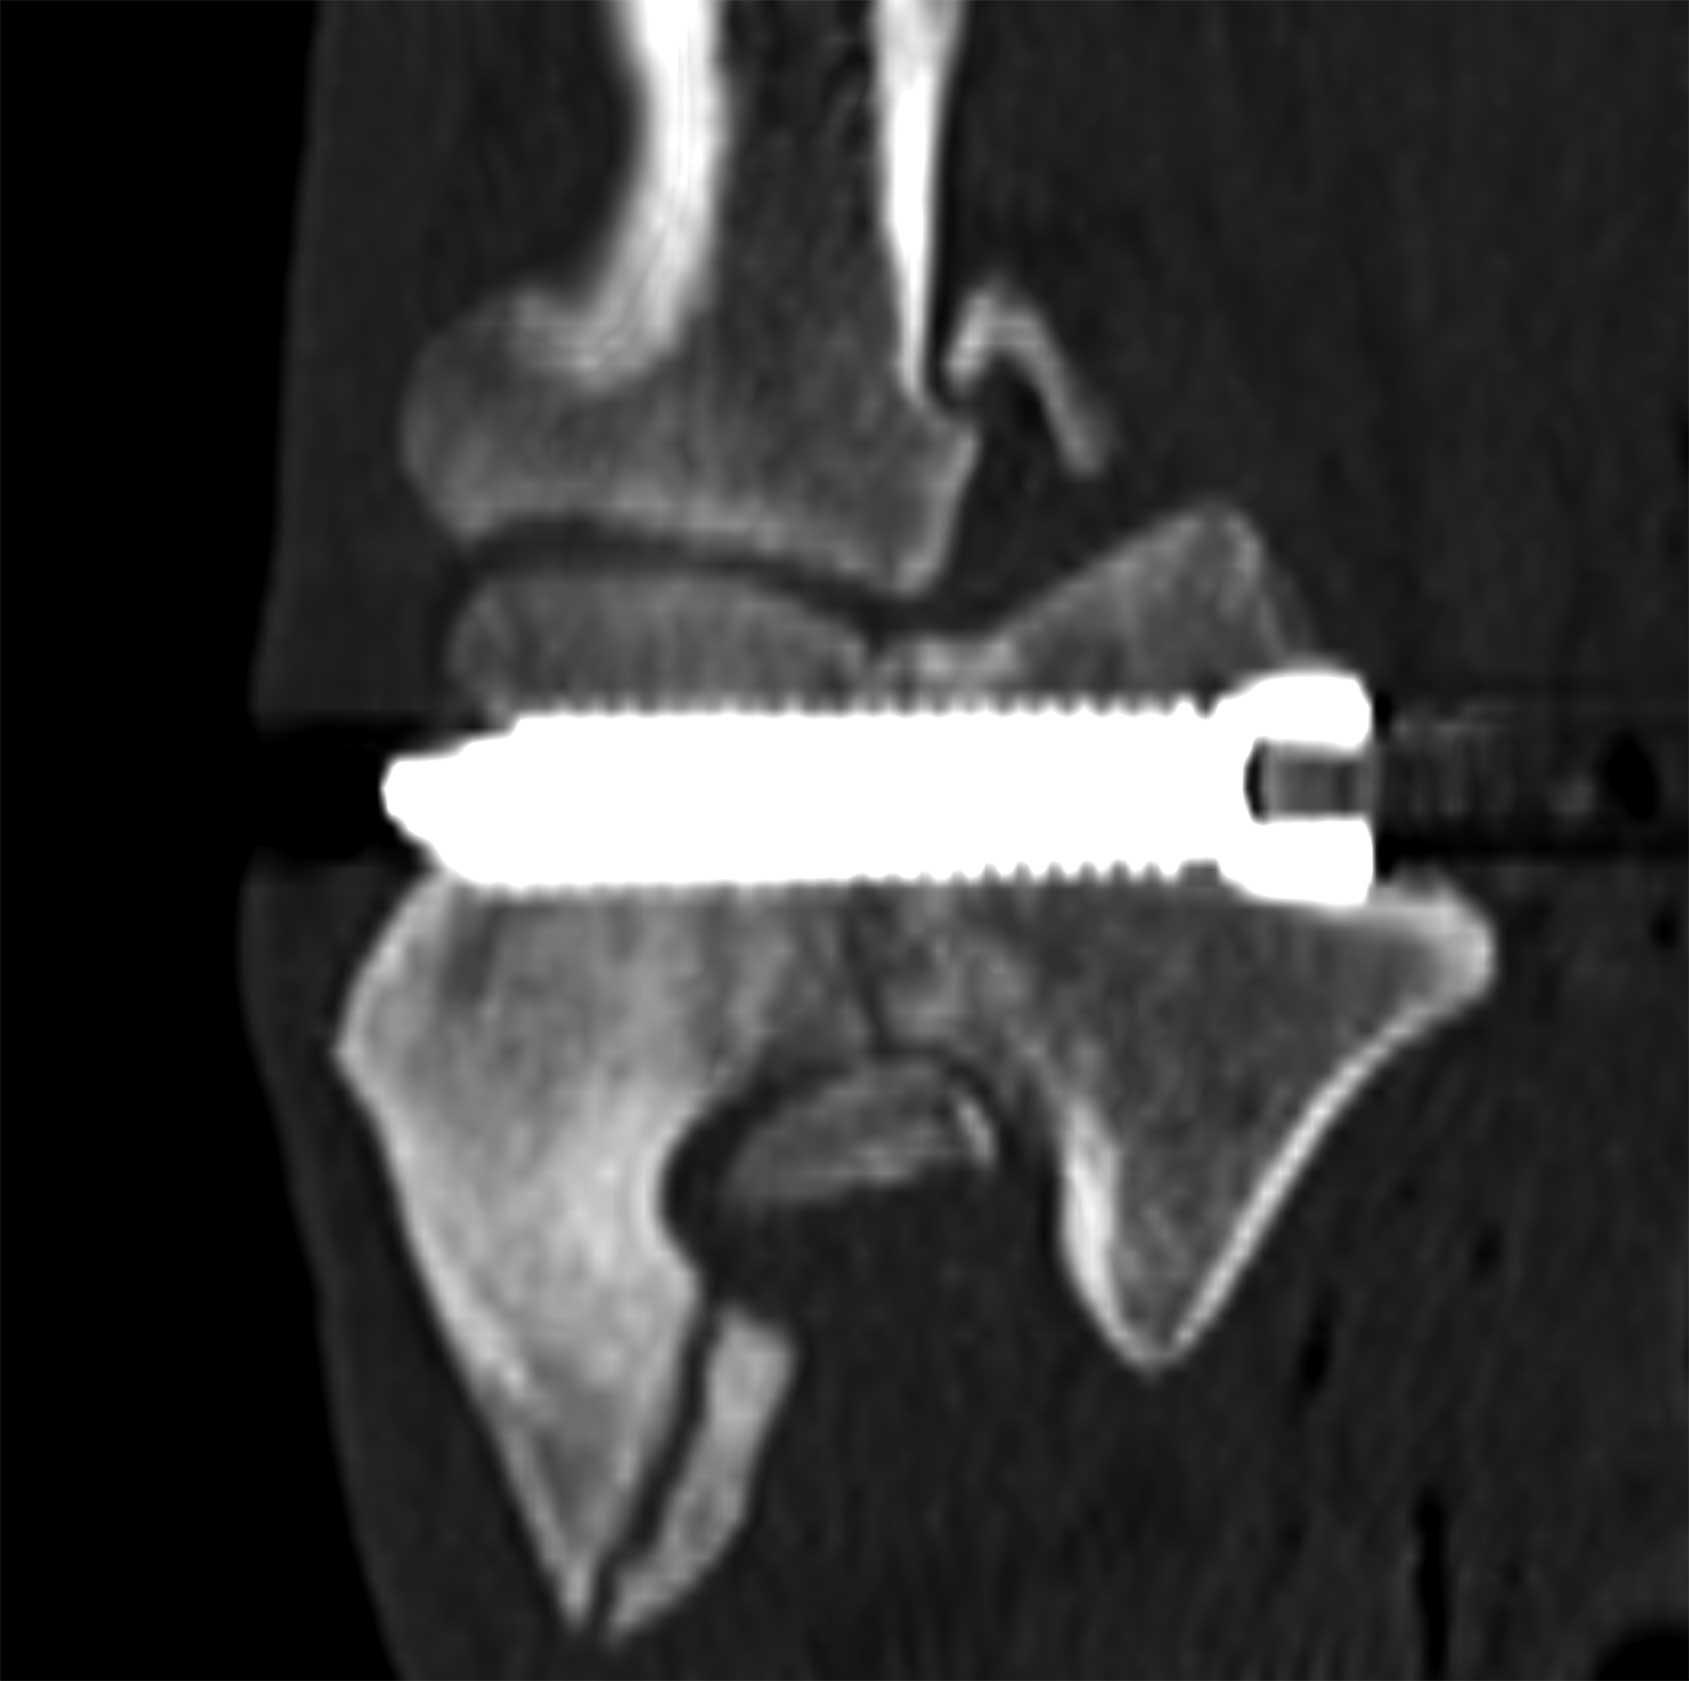
A postoperative CT confirmed an excellent trajectory of the screw, with the very tip of it protruding laterally (Figure 6).
A dressing was applied to the leg to limit postoperative swelling and the dog was discharged the following day for two weeks of caged confinement, followed by another four weeks of gradually building lead exercise. The dressing was removed after 7 days and the skin sutures after 14.
Lameness was resolved after six weeks and a normal activity pattern resumed.
This case was interesting in particular because the dog had both an HIF and medial coronoid fragment; which was causing lameness is impossible to say, but as there were such clear signs of an imminent fracture of the lateral epicondyle, the author felt it was prudent to prioritise stabilising the condyle.
It was also felt that arthroscopy of the elbow prior to stabilising the condyle did pose some extra risk of causing a fracture, and it was for this reason the author elected to place the scope via the open approach after placing the screw.
The cause of the HIF is unknown and there appears to be two different presentations of the condition: incomplete ossification of the humeral condyle occurring in skeletally immature dogs, and stress fracture of a previously intact humeral condyle seen in older dogs.
Spaniels are over-represented, but the author has also seen HIF in Labrador retrievers, French bulldogs, a Newfoundland and a Münsterländer.
Historically, 4.5mm cortical screws have been placed as both lagged screws and positional screws, from either medial to lateral or lateral to medial, in an attempt to stabilise HIFs.
Osseous fusion across the HIF will often not occur and despite such large screws, cyclic loading and subsequent implant failure some time after surgery has been reported; in some cases, this may present as a subsequent fracture. Other complications encountered after placing these screws include infection and seromas (Hattersley et al, 2011), and some have speculated that infection or seromas may be more common in screws placed from lateral to medial.
In an attempt to minimise the complications, as large a screw as possible is placed from medial to lateral as a positional screw. However, placing the trajectory into the lateral side is more challenging than into the medial side, as the lateral aspect of the condyle is much smaller; therefore, the use of patient-specific guides provides a huge advantage over intuitive “eyeballing”, and the accuracy has been demonstrated (Easter et al, 2020).
Two specific implants are designed for the treatment of this condition: the shaft screw has a 4.5mm core across the defect; however, it has to be placed as a lagged screw and has a large bulky head.
The humeral intracondylar repair system is a self-compressing screw placed using a stepped drill to create a void around the central portion of the screw, allowing demineralised bone matrix to be placed into the site of the fissure with the aim of stimulating fusion across the condyle (Walton et al, 2020).
This, too, is a very large implant by comparison with the size of the condyle and placing the stepped drill in exactly the correct trajectory would also be aided by the use of patient-specific guides.
Using a 5mm locking screw allows for maximal core diameter of a screw. As the strength of the screw is proportion to the radius to the fourth power, small increases in size make a big difference in strength.
Additionally, the head of a locking screw is relatively less bulky than that of a cortical screw, with the aim that this will cause less irritation to the soft tissues on the medial side.
The use of a titanium implant means that CT can be used postoperatively to assess location, and titanium is better at resisting cyclic loading than steel: cyclic loading being the cause of implant failure.
In the author’s experience, placing these very large screws with a very high degree of accuracy using the patient-specific drill guides provides a robust solution with a very low rate of complication.
As demonstrated in this case, dogs with this condition can be treated successfully to return a pain-free, good-quality and active lifestyle.